Tuesday, March 17, 2009

Madeline my madeleine

I've been intrigued...OK obsessed with with Madeleine cookies for a long time. I have seen them, they are shell shaped cookies that look like yellow cake, and wondered if they were tasty or not. They are right by the register at Starbucks, but they don't really set the standard for pastries if you know what I mean. Then I heard or read about someone making cornbread Madeleine's and that was it...I had to get me one of those Madeleine pans. Thus enters the problem in that I don't buy things for myself. I'll go pick something up and walk around with it but put them down and skulk out of the store.

In order to experience these cookies I needed the pan. Since I had at least two uses (original cookie and cornbread version) for an item, I could justify getting one. So, off I went to Williams-Sonoma and $54 later i had a Madeleine pan ($14)...all in one zyliss zester grater microplane and some Key lime lemon curd (for another recipe it was on clearance). I'm super excited about the zester grater thing--too cool. I was pretty excited about the pan, too. Mine is silver, bright shiny silver.
As I typed this post and scoured the Internet for pictures (thanks Williams-Sonoma for supplying the photos. Please visit their site and purchase something.) I realized I had been spelling Madeleine wrong...imagine that! It is spelled m-a-d-a-l-E-i-n-e which would explain the bizarre recipes and even worse pictures. I'll have much better luck researching the recipe with people who know how to spell the thing!
The recipe I found (with the wrong spelled name) was good. It's the one I'll post today. I highly recommend you getting yourself a Madeleine pan...these suckers took all of 20 minutes from start to finish to make that's it! I'm so excited about trying cornbread in them. More on that later.
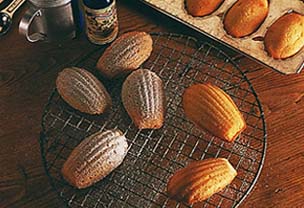
Here's the recipe for Madeleine cookies. if you don't have a pan...you can cook these babies in a muffin tin (mini or not) and they turn out the same you just can't call them Madeleine's...you'd have to call them by her evil little sister's name...Agatha.

Madeleine Cookies:

5 T. butter (melted and cooled)
1/2 cup flour
1/2 t. baking powder
1/4 t. salt
1 egg
1/3 cup sugar
1 t. vanilla
1 t. grated lemon zest (or lime, or, orange, or you get it)
Powdered sugar for dusting.
Preheat oven to 375 (if your pan is dark go with 350). Spray pan with non0stick spray (I use the flour/nonstick spray).
In a medium bowl: sift together the flour, baking powder, and salt. In a separate bowl: add egg, vanilla, zest, and sugar and mix until blended. Add flour to egg mixture and mix until blended. Slowly add your melted butter and stir to combine.
Spoon a heaping tablespoon of batter into each mold. Bake until puffed and golden around the edges (about 12 minutes) 10-15 minutes. Remove from pan and dust with powdered sugar. Now go to a closet and eat the whole batch. I used my small ice cream scoop because it's exactly a tablespoon (yes...I measured) and it worked great. I had maybe two tablespoons of batter remaining, but didn't mess with it. You'll want to fill the molds to 2/3 full.
I've seen pictures with these babies dipped in chocolate. This made one batch of 12 large cookies.
Try these. If you have ever eaten a tea cake and said to yourself, "i wish it were crispier...and shaped like a shell" then you'd be in luck. Seriously, though they are good and do remind me of tea cakes (the good kind, not the ones that will absorb all of the saliva in your mouth and shut your salivary glands down).

Monday, March 16, 2009

Triple Chocolate Toffee Chip cookies


I love cookies. It's much easier to say, "no nuts...no raisins" everything else is pretty much a yes. I bake a batch of cookies nearly every week to fill the cookie jar and we sometimes get stuck on a particular type of cookie. I would say that our standard cookie of choice is the white chocolate chip craisin cookie hands down. We love those cookies. About two-three weeks ago my friend Jamie came to work raving about a cookie she had and just happened to make. They were delicious. I had to have this cookie recipe. After talking about the results of this cookie I made some minor changes and am happy to say that this recipe will probably be on your top ten list after the first bite.

For me the trick is in the toffee chips. These little bugger hide in the amber colored cookie and sneak up on your taste buds like a room full of party goers. A terrific crunch, sweetness and all around wonderful addition to a cookie.

Triple Chocolate Toffee Chip Cookies:

  • 1 cup butter, room temp
  • 1/2 cup butter flavored Crisco
  • 3/4 cup sugar
  • 1 3/4 cup brown sugar, firmly packed
  • 3 large eggs
  • 1 tablespoon vanilla extract
  • 4 cups flour
  • 1 tablespoon baking soda
  • 1 teaspoon Kosher salt
  • 1 pkg. Semi-sweet Ghiradelli Chocolate morsels
  • 1 pkg. Ghiradelli Milk Chocolate Morsels
  • 1/4 cup 60% Cacao Bittersweet Chocolate Chips
  • 1 pkg Heath Toffee pieces

Directions

Preheat oven to 375 degrees F. Line cookie sheets with parchment paper.

With a stand mixer fitted with the paddle attachment, add butter, shortening and sugar beating at medium speed until creamy five minutes. Add eggs one at a time and vanilla, beating well.

In a small bowl, combine flour, baking soda and salt; gradually add to butter mixture, beating until blended. Stir in chocolate morsels and almond brickle chips. Drop cookies by 1/4 cupfuls about 3-inches apart onto prepared baking sheets. Bake for 11 to 12 minutes, or until lightly browned. Let cool for 2 minutes on baking sheets.

Remove to wire racks to cool.

I used a large spring loaded scoop ant it worked great. For my oven I needed to make these about 11 minutes.

Kendra and I put a slice of bread in the bottom of our cookie jar and marvel and how fresh it keeps our cookies (when they last that long). Th e bread gets hard but the cookies won't. Give this cookie a try, they are worth it!

The picture below is of Emma who I chased down and caught red-handed with two just cooled cookies. She ate them both, alternating bites from each cookie to fully corrupt them. She's our little cookie monster...so precious!

Thursday, March 12, 2009

Hash it out...

I have a recipe for Mexican hash, which I've had for quite some time. I can't quite remember where I got the recipe and don't really make it very often, but I do get cravings for it. I've taken the original recipe and made it my own by little tweaks here and there. It's a super simple, quick and easy recipe that the whole family loves. Enough said let's get started.

Here's what you will need:
One onion (about baseball size, you'll want to yield about 1 cup or so)
One pound of ground beef
Seasoned Salt ( I use Lawry's)
1 tablespoon Cumin (again I just use a cupful I use mostly McCormick spices)
Pepper ( I like to use fresh cracked pepper, but I'm not a snob about it)
1 tablespoon of Oregano (I just fill the lid and sprinkle it in, calling it good)

One can of Ro-Tel (this is a tomato and green chili blend, any brand will do)
One can of Pinto Beans (I use Ranch style, which is everywhere in my neck of the woods)
One can of Enchilada Sauce (I always grab Old El Paso and haven't really ever tried anything else)
Doritos or Frito's
Condiments (this where you can do what ever you like some thoughts are below)

Onion 101:
I would venture to guess that I've watched close to 5,000 hours of cooking shows in my life, if not more. Public television was my friend for years: Frugal Gourmet, Jacques Pepin, Justin Wilson, Lydia's Kitchen, Martin Yan, Julia Child, Galloping Gourmet, all taught me great things and kept me great company. Then came the Food Network and...well it's the FOOD NETWORK!
Jeff Smith (Frugal Gourmet) taught me how to cut with a French knife and I'm eternally grateful to him, thanks Jeff. I picked up a trick to cutting onions that really works well if you are looking to get a diced onion, for frying and stuff like that, and don't want to dirty a food chopper. It's really easy. Here's all you do:
  • Cut the tips off both ends of the onion, then peel off the outer skin, you want a flat surface so the onion won't get all antsy and roll on you.
  • Using your sharpest knife make 5-6 cuts into the onion going 3/4 of the way down each time, you don't want to cut through the onion.
  • Next, turn the onion one half turn, so the cuts you have just make are now horizontal and not vertical. Do the same thing, 5-6 cuts 3/4 of the way down.
  • Turn the onion on it's side and slice straight down Usually about 5-6 slices is all you need, enjoy the waterfall of perfectly diced onion pieces.
  • When you get to the end of remaining 1/4 of the onion, just turn it to it's flattest side and chop finely.
  • This is step saves the most cutting and gives you great uniform results.

Ok, back to the hash.
In a large skillet:
  1. Place 1T. of olive oil or butter in your skillet and heat to medium. You want the oil to evenly coat the skillet, or the butter to melt. As the oil heats it will get more..."flowy."
  2. Add your onion and cook over medium heat for 5-6 minutes until they are beginning to release their juices and turn clear.
  3. Add your ground beef. I buy the leanest meat I can and wish I had butchered a cow. We had some butchered beef (given to us as a Christmas gift) and I am forever ruined to any other meat. This is the point where you season the pan. If you wait until the meat is cooked the meat gets all reclusive and won't let anyone in to visit and spice up it's life. Fry your ground beef until it is no longer pink. Note: I use a potato masher to get the meat all nice and ground up, no huge chunks, just smooth Finley mashed meat.
  4. Add your cans of beans, ro-tel, and sauce, stir well. Now let this sit and cook for 30 minutes, stirring twice. I set my timer for 15 minutes, stir, set it again and let it go. This will give you time to get the rest of your duke together. And, the meat has time to let go of it's water and concentrate on being thick and delicious. This is what it will look like at the beginning of the 30 minute stewing.

  5. While the hash is stewing and getting all happy get your duke together.
  6. I like to use crushed Doritos (this recipe usually starts calling my name when we have a 1/2 bag of Doritos left and they are all already crushed to bits anyway!), you can use Frito's too. Lettuce, tomato, cheese, sour cream, salsa, guacamole, onion, olives, jalapeno, there is no limit to what you can do to this dress this up--it's your palate be creative.
  7. The hash will be thick and delicious when it's stewed for 30 minutes. Turn off the heat.
  8. Build your hash: chips, meat, cheese, lettuce then whatever else you want.
This is really, really good. It might remind you of taco salad, but it tastes different to me.

I just had a though! Right now. You could take this hash and call it Mexican sloppy Jose (get it!). What a great left over use. Toasted buns, hash, lettuce and cheese...oh man I have to make this again and make sure I have enough for my new creation: Sloppy Jose's! I'm so excited.
Come back and let me know if you like this...don't let me know if you hate it as I'm super vulnerable and live close if not over the edge most of the waking hours of my life.

Tuesday, March 3, 2009

Loafing Around


If you were to ask 100 people to make a meatloaf and bring for a tasting you would most likely have 100 different variations. Meatloaf is one of those things that you like, "your way" or no way. I personally do not like to corrupt my meatloaf with chunks of anything, especially green bell pepper. I don't mind onions, or red bell pepper in meatloaf, they just need to be very finely chopped. I like meatloaf the way my Mom made it, and followed that recipe until about ten years ago when I ran across a recipe that became my new favorite. Of course I have to change it and add my spin on it, but I have to tell you it is wonderful.

I think there is a federal law that you have to have mashed potatoes with meatloaf, and green beans. People ask me ALL the time how to make mashed potatoes and I don't really know how to respond, kind of like trying to describe how to boil water to me. I did add a recipe for mashing potatoes in my cookbook, and will share that with you then move on to the meatloaf recipe I hope you will love.

For excellent mashed potatoes you will need one potato per person, then one for the pot. Peel and dice the potatoes, in uniform chunks. Add to a large pot and cover with at least an inch of water. Cover and bring to a boil over medium heat. When the potatoes come to a boil, add 2 tablespoons of salt to the water. Cook 5-7 minutes until a fork will easily slide into the potato. Drain the water. Add the potatoes back to the pot and add about 1 tablespoon of butter per potato used (if they are small potatoes like say kiwi size, use one tablespoon per two). Using an electric mixer, begin mixing on low to incorporate the butter and potatoes. When the butter and potatoes are smooth add enough half and half (ok, you can use milk) to reach the creaminess you like. I usually add about a cup of milk to the big batch (8-10 potatoes) we eat. Season with salt and pepper. Taste and adjust to your personal preference. Oh, I prefer Yukon Gold potatoes over any other.
My Meatloaf

1 lb. Ground Meat ( I usually use a mixture of breakfast sausage and ground beef)
1 1/2 cups crushed Fritos corn chips
4 stems of green onion, finely chopped
12 oz. Bottle Heinz Chili sauce
2 eggs
1 Tablespoon Chili Powder
1 teaspoon salt
1 Tablespoon ground pepper

Preheat oven to 375 degrees. Spray an 8 compartment mini-loaf pan with non-stick cooking spray, set aside. In the bowl of an electric stand mixer fitted with a paddle attachment, add all of the ingredients to the bowl and mix until completely combined. Evenly fill loaf compartments and top with chili glaze. Bake for 25-30 minutes or until firm and juices run clear.

Chili glaze:

1 cup ketchup
1 tablespoon of chili powder
1/2 cup brown sugar

Add ingredients to a small bowl and mix completely, spread evenly on each mini-loaf.

Notes:
  • I like to use a stand mixer because it really breaks the meat down and gets the mixture very smooth. I really like the texture of the finished loaf.
  • I usually add about 1-2 tablespoons of water to the chili sauce bottle and shake to get all of the sauce out.
  • These bake really quick so check them around 25 minutes.
  • There is nothing I like more than the end piece of meatloaf. If this is your favorite too, then you are in luck because the mini-loaf pan give each loaf a great crust.
  • I usually double the glaze and use some for dipping when the loaves are cooked. DO NOT DOUBLE DIP THE SPOON YOU USE. Dollop a heaping spoon of glaze on each loaf, don't touch the meat with the spoon. When you've dolloped all the loaves, then smooth it out.

Sunday, March 1, 2009

Banana Orange Poppyseed bread


I'm a huge fan of quick breads. I was just about to type out my definition of what a quick bread is when I realized that you could just read this and call it a day. If you were playing match game and Gene Rayburn said, "Mary Cornwal Gettner was in her kitchen when she tripped over her can and landed in a 'blank' muffin" all of the contestants would certainly say Blueberry. The same is true for quick breads, if I were to say, "blank bread" you would probably say banana, wouldn't you? I think you would.

I searched for years for the perfect banana bread recipe, at least the banana bread perfect for me. I finally found a recipe that I could tweak to make it just perfect for my taste. That recipe is the foundation upon which I built this recipe. I'm not really sure how I came to create this other than just admitting that it was a whim and I had oranges. I have to say that it came out better than I expected and is quite good.

Mini-loaves of quick bread are the standard in our kitchen, we just don't use the big loaf pan for some reason. I think it has to do with the sheer portability of a mini loaf of bread and the fact it is beyond cute and precious. Having a mini loaf pan in your pantry is certainly not a splurge as you can use it for meatloaf and quick bread, or quick sorting knick knacky things. I can justify any purchase if I think of three different things/uses!

Banana Orange Poppy seed Bread
1 1/2 cups sugar
1/2 cup butter, room temp
2 eggs
1 1/2 cups banana (about 4 medium)
1/2 cup buttermilk
1 tablespoon vanilla
1 tablespoon poppy seeds
Zest of one orange (a little more than a tablespoon)
2 1/2 cups flour
1 teaspoon baking soda (I don't level off)
1 teaspoon salt

Preheat oven to 350 degrees. Spray loaf compartments with non-stick cooking spray and set aside.

In the Bowl of a stand mixer, add sugar and butter. Turn on medium and mix until combined, two-three minutes. Add eggs one at a time, mixing until completely combined. Add bananas, buttermilk, vanilla and beat until smooth. Add remaining ingredients and mix until smooth, one-two minutes.

Fill each loaf compartment 3/4 full. Bake 30-35 minutes or until cake tester comes out clean. Cool five minutes, then remove to a cooling rack. When completely cool, dip in glaze and return to rack. Once glaze is dry, wrap individually.

Orange Glaze:

Juice of one orange
1-2 cups powdered sugar
1 teaspoon of orange zest

Add orange juice to a small bowl. Slowly add powdered sugar until thick and smooth.

Notes:
  • I don't mash the bananas, I let my mixer to the work. I just add them whole, and I have never had any trouble with the breads not turning out.
  • When I dip the breads, I just hold them upside down and dip straight down into the glaze. I will hold the bread over the bowl until it stops dripping then turn upright.
  • I put parchment paper under the cooling rack so it will catch the remaining glaze the drips down.
  • I have a large Pampered Chef spring-loaded scoop that I use to fill the compartments of the loaf pan. It takes two scoops to fill one compartment, I can get exactly 8 mini loaves out of this batch.