For this recipe I tried an experiment. I'm no scientist, but I do like to find out what works for a recipe. If I'm using Crisco butter sticks for chocolate chips cookies I do not use the following recipe, I use this one. This is my standard go to recipe for Chocolate Chip cookies using real butter. The experiment was to see how flour affected the end result. I like cookies on the thick side with some chew, not thin and crisp. I always add more flour to the mix, more baking soda, and more vanilla, and some almond extract a secret NEVER before revealed, until now.Which make it my "own" recipe, I guess.
As with most of my recipes I have they are not original to me, just tweaked and changed with things added here and there to make a different recipe. For the experiment I decided to go with the original recommended amount of flour (2 1/4 cups) and add my tweaks. The result were thin, crisp cookies that were crunchy. If you are a crunchy, crisp, thin cookie kind of person--this this is your cookie recipe at 2 1/4 cups of flour. If you like the thicker, chewier cookie then go with my recommended amount below.
Chocolate Chip Cookies
- 2 cup(s) Milk Chocolate Chips, basically one bag of chips
- 1 cup(s) butter or margarine, at room temperature
- 1 cup sugar
- 1 cup brown sugar
- 2 large eggs, room temperature
- 1 tablespoon vanilla extract (Pure vanilla extract please)
- 1/8 teaspoon almond extract, basically a cupful
- 3 cups unsifted flour
- 1 1/2 teaspoon(s) baking soda (I just use a heaping teaspoon and call it good)
- 1/2 teaspoon(s) salt
And now, for the tips that I've learned along the way:
- Room temperature butter DOES make a difference. I knew I was going to be baking, so I put the butter and eggs on the counter about 30 minutes before I started cooking and it was great. You can always nuke the butter for 15 seconds to get it soft. Here's why it's important: The fat (butter) and sugar need to become one with each other. The softer the butter the more open it is to welcoming strangers into it's life--like sugar. Sugar is a crystal which means it takes a bit for it to break down.
- Mixing butter and sugar together DOES make a difference. I usually mix my butter and sugars together for at least 5 minutes, usually 7-10 minutes. This give the butter time to whip up and the sugar to break down. It still feels grainy, but not coarse as if you were mixing by hand. The dough should be off-white in color and fluffy. Think mashed potatoes here.
- The picture to the left shows the cookies with 2 1/4 cups flour and the full 3 cups of flour. The cookie on the left, the darker one,
 is the 2 1/4 cup cookie. This was same pan, same scoop, same temp, just the deleted flour. See how the cookie spread out more? It's also much darker. I'm guessing because there is more sugar than flour and that changed how it worked. So, flour matters. The 2 1/4 cup dough was wet and sticky while the 3 cup dough was dry and tacky. The 3 cup dough was firm, kind of like play dough--held it's shape. I think the extra flour helped the cookie dough not break down and spread out as much.
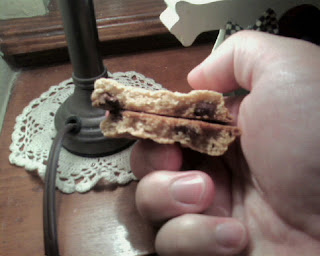
 - The picture to the right was taken to show what the 3 cup dough looked like baked. See how cakey it is? There are some air pockets along the edge, but the center is chewy and delicious. The 2 1/4 cup dough had air pockets all through the cookie. The picture I took was horrible. I'm working with my camera phone here, folks give me some slack. This is how I like my cookies so I use the 3 cup dough.
- Baking time matters. My oven takes 9 minutes to bake a cookie to perfection. At the point I take out the cookies, they are just starting to brown on the edges but still look somewhat moist on the top. There is a term in cooking circles called,
 "carry over cooking." Basically, carry over cooking means your food will continue to cook out of the oven. It's especially important when cooking meat. With cookies I know that the cookies will firm up and be perfect at 9 minutes because I let the 2 minutes it takes for these babies to cool down to cook some more.


Maybe this is the recipe you are looking for in a chocolate chip cookie, maybe not. Hopefully it will help you determine what you like in a cookie and go for that. Crispy and crunchy cookies will have more sugar than flour, cakey and chewy will have more flour than sugar.
I'm going to go eat one of these now, can't take it anymore.
No comments:
Post a Comment